Spiced Caramel Nut Granola

This is the first post in a series of what I call “Pin There, Done, That.” Most of us have heard of the very popular site/app Pinterest, and I would go so far as to say that most of us love it. In this series, I will be documenting my experiences with trying things that I find “pinned” on Pinterest. There will be a variety of different post but I thought a recipe was a good place to start. So let’s jump in…

Screen Shot 2016-07-15 at 6.34.43 PM

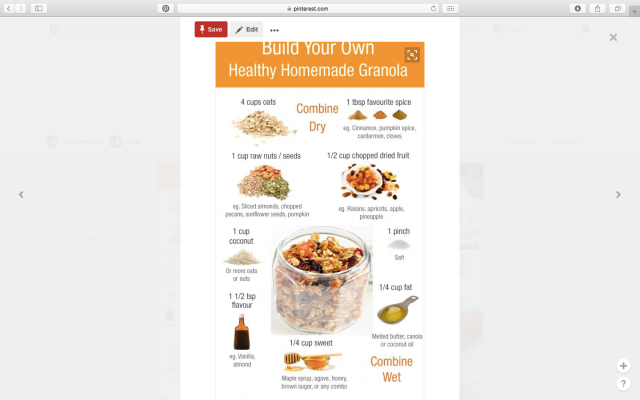
I found this pin and decided to use this infographic as a base to create my own homemade granola. First, this pin is super easy to locate. Type in “granola” in the search bar and BOOM it is literally the first pin to pop up. For this recipe I worked with what I had and what I like. The infographic seemed suggestive in some areas so I just went with the flow. Please note that for this recipe I only referred to the infographic and did not actually click the link to the website, RecipeTin Eats until I had cleaned my kitchen and my granola was already in the oven. Continue reading

Status

Article: “TOM” Eating Habits

TOM (or time of the month) can be tricky, and for everyone it is different. This article I just read from  Women’s Health (2014) could help you eat your way to be happier TOM. 😉

P.s. 

I should probably look at the websites I save to my reading list more often. I mean really, 2014 😨!

Status

Article: GOT ** NO SPOILER** 

If you follow Game of Thrones, the famous HBO series that has had many viewers clinging to the edge of their sofas since season one, then you may have heard that there is a wait for winter to come. This article that I read today will get us fans to swirl ideas and possibilities around in our minds until cold weather returns. Click here to read. 

Mistakes and Epic Fails: Heat🔥

I grew up with natural hair and to this day I remain unrelaxed. It wasn’t exactally a choice either, it was more out of fear of going bald, because that is what people said would happen to me if I got a relaxer. These people were not professionals and had no real reason to believe that my particular hair would fall out but because of them I never got a relaxer. I wanted to be “cool” though. Girls my age were now going to the salons on the weekends with their moms and I did not feel like my press and curls were up to par. I wanted to have the ultimate cool girl hairstyle- a duby. My mom would not let me go to a salon and the lady who did my press-and-curl tried her best to give me the elements of a duby, but my hair would not catch the breeze. My hair was too pressed, and curled too tight, and there was no “flow” to it. I got frustrated and ventured off into a new world alone, the world of flat irons, curling irons, and doom.

Granted, as a girl in her early-teens could I really be trusted with the care of my own hair? NO! because soon the flat iron became my best friend and… Burn, baby BURN! My hair became totally fried. Yes, it was straight, exactly what I wanted, but my ends were breaking off and it seemed like it was getting shorter. It would be years later when I would learn what it mean to retain length or how to accomplish it. But I didn’t care then.  We didn’t have a heat protectant in our collection of hair supplies. I didn’t even know what that was, much less how or why it should be used. As far as I knew grease and oils were bad and that was the end of the story. Natural hair wasn’t a lifestyle, it just happened to grow out of my head that way. Right?

Wrong. The whole game changed when the boy I liked told me that he had been avoiding me because my hair smelled burnt.😳 OMG! I thought I would die. I washed my hair as soon as I got home from school and “cleaned” my flat iron. I took extra “care” not to burn my hair- wash, condition, moisturizing hair lotion, blow dry, and I even turned my flat iron down to straighten it. The next day I looked like a huge Frizzball, but I had hope though. Hope that everything was better, that my hair didn’t smell burnt anymore and, of course, hope that he would like me back. But when I looked at him with some much hope he looked back at me with the saddest eyes. Shoot! Still burnt and disgusting! I was so embarrassed. Dread covered me and I wanted to disappear completely.

It became a fear for me, constantly smelling my hair like the weird girl in an unwritten Lifetime movie. Eventually, it got better but that flat iron had to go! I got a new one that I felt I could trust and thankfully life went on. Getting it “right” didn’t happen right away though, and I am still learning so much.

Lessons to be learned from Heat Fail:

  1. “Natural” does not always mean you know how to care for your hair
  2. “Cool” or “trendy” hair does not aways equate to healthy hair (even if it is a natural style)
  3. Low heat styling is healthier for hair
  4. Use a heat protectant
  5. Deep conditioning is important and can help with damage hair
  6. Natural oils are awesome! Some benefits for hair grease has been appreciated by others as well
  7. Hair shouldn’t have an odor, burnt or otherwise
  8. Old or damaged styling tools can cause damage to hair. Be prepared to replace dated styling tools as needed
  9. Frizz is Be-You-TiFULL! Embrace and love your voluminous hair. Some people would gladly trade you
  10. Do not be embarrassed for what you do not know. Do your research to get accurate information on how to care for your hair. It is very much a process of trial and error.

Review: “Why Not ME?” by Mindy Kaling

I recently subscribed to a new (to me) app by the name of “Scribd.” On this app I am able to listen to audiobooks as well as read books. There is a fee for subscription. “Scribd” is available in the Apple Store and on Google Play. I noticed that it also list Kindle Fire as another device on the website but I have not yet figured that out. I recently finished listening to Mindy Kaling’s audiobook “Why Not ME?” Below I have included a link to my review of this book from goodreads. For more information about “Scribd” click here.


DIY Moisturizing Face Gel

I have always had normal/dry skin, depending on the season. With the winter season in Ohio approaching my skin has been changing. During the warmer months my skin was hydrated (few dry spots), blemish free and glowing. The cleansers I use, based on the needs of my skin at that time, are still working but I want to switch to using more natural products. I have yet to finish the cleansers but the moisturizers were the real problem. All of the ones that worked separately on my face for different issues were now aiding my breakouts, drying my skin out even more, or leaving my face feeling extra greasy or sticky.

Recently I set out on a mission to find a new natural/organic facial moisturizer. After researching and attempting to shop I was too confused and frustrated to continue on. After all, my budget is real and some of the products can get expensive. I gave up and decided I would make my own. I looked on Pinterest at several post and decided on a base that will work best for my skin (I did not think that coconut oil would be a good base for my confused skin). I concocted my own moisturizer.

Moisturizing Face Gel Ingredients

Moisturizing Face Gel Ingredients

DIY Moisturizing Face Gel

3 oz bottle (travel size)

Aloe Vera gel (a little less than half of the bottle)

Water (about a tsp)

Sweet almond oil (8 drops)

Vegetable glycerin (2 drops)

Essential oils of choice (I used 6 drops of tea tree oil and 12 drops lavender)

Jojoba oil (4 drops)

*These are not exact measurements. I did have to tweak my ingredients. The bottle was small enough for me to eyeball it.** Play with different formulas until you get the right results for your skin.*** Do not fill your bottle all the way up to the top. Leaving a little extra room in the bottle will allow the ingredients to mix better and space to add any ingredients later.

My face before moisturizing. Note the dry areas around my mouth.

My face before moisturizing. Note the dry areas around my mouth. I had not moisturized my lips yet either.

I applied the moisturizing face gel (MFG) to a clean, dry face in the morning. Soon after the application the dry patches around my mouth (problem area) were still visible (less so, but still noticeable). I applied MFG again paying special attention to the dry spots. My skin around my mouth had dried out so fast that I added the following 3 ounce bottle the next day.

Organic Extra Virgin Olive Oil (about 2 drops)

Jojoba oil (2 drops)

Prior to adding the additional oils I had tried the original MFG overnight to see how it affected my skin. Usually I wake up very oily. When I awoke the next morning I did notice a big difference. My face was not as gross as usual. I was less oily and was able to get a nice clean feel without the use of my Clarisonic. I was pleased but there was still the issue of all-day-wear. So I proceeded as planned and added the new oils to the original MFG.

The addition of these two oils made my skin feel fully hydrated after one application. I was actually able to see some other parts of my face were not only dry, but also raw. The MFG did not further irritate those spots but soothed them. However, I will have to spot treat for a little extra TLC (possibly by using Shea butter overnight with MFG).

Tips: 1). Research your oils and products prior to use, 2). Do a spot test on an arm or leg to make sure you do not have any allergies or sensitivities, 3). Beware of too much oil it could make you shiny or… oily, 4). The cost of oils can get expensive. It is my opinion that I get more bang for my buck when I purchase items separately rather then already mixed. Most oils have a good shelf life and if stored properly can last a long time. It is more cost-efficient for me to replenish an oil for a DIY than to buy a product I’m not sure as far as both the ingredients and the results. Plus, with the oil on hand there are more opportunities for fine-tuning and other projects.

I hope this helps out if you’re looking for a DIY moisturizer. Let me know how it goes if you try it out and how you made it work for you.

UPDATE: If you make this moisturizer I suggest storing in a glass container so that the oils are not disturbed by the plastic. Also, I have discontinued my use of this moisturizer. Some time long after making this moisturizer I had some challenges with my skin which were unrelated to this moisturizer. You can read about that here.

Let your radiance shine through,

Endia